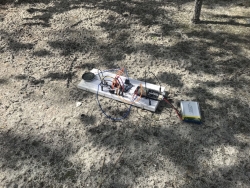
Komorebi Larva // DIY kit, Matteo Marangoni and Dieter Vandoren, 2020
This kit and manual was produced for the “stay at home” 2020 edition of Into The Great Wide Open festival. It was published in the magazine De Kritieke Massa, together with Matteo Marangoni’s essay “On Frogs, Fireflies, Invention and Imitation”, original version here. The English version of the essay is available here.
Komorebi is an electronic life form that is expected to be observed in the nature of Vlieland during Into The Great Wide Open 2021. Until recently, only the adult form was known. Now an earlier stage of development has also been observed: the Komorebi Larva.
Although the adult Komorebi is always in large flocks, the Larva develops in isolation and can be assembled at home by readers. The Larva is very similar to the Komorebi: autonomous microcontroller core, light sensitivity and vocal sound producer. There are also major differences. The Larva is still deaf, shows no luminescence and does not have a weather resistant covering.
Once assembled (readers who have not ordered a kit can obtain the components themselves!), the special behavior of the species can be studied: an ever-evolving sound game, sensitive to changes in light intensity. This is best observed by placing the specimen in different situations: in a forest where the sun's rays and leaves create a flickering carpet of shadow and light, under the open sky where wisps of cloud pass by, behind the window at nightfall. Early studies seem to indicate that the species' behavior is best perceived by leaving it untouched for quite some time. Once in position, it is allowed to run without disturbance. The dynamics of his sound playing will then be given the necessary time and space to develop.
We invite everyone to bring the Larvas to the festival in 2021. They will long to be reunited with their own kind. In a workshop we will develop them further and let them sing together. Maybe they will develop into adult Komorebi?
Download file package here. Includes this guide, circuit diagram and program code. (Images also at bottom of this article.)
Components:
- - Breadboard
- - LiPo (lithium polymer) battery
- - Wemos Lolin D32 microcontroller board (with ESP32 processor)
- - PAM8302 2.5 watt audio amplifier board
- - LM358 op-amp (signal amplifier)
- - BPW34 photodiode (light sensor)
- - 3 watt, 8 ohm speaker
- - set of resistors: 330 ohm, 1k ohm, 10k ohm, 100k ohm
- - set of jumper wires
Not included: micro-USB cable for charging the battery (and optional reprogramming of the microcontroller), screwdriver for speaker connection
How to assemble the components:
The so-called "breadboard" is a tool for making electronic circuits without soldering. Very useful when experimenting. Visible is a matrix of holes where components can be inserted. Underneath are conductive tracks that connect the holes.
Open the circuit diagram image file and start by plugging the microcontroller, amplifier, op-amp, and photodiode onto the breadboard as shown. Pay close attention to the orientation of the components. When placed upside down, they will not function and may break due to a short circuit. The op-amp and photodiode are marked with a (very) small dot. It points to the left for both.
Then connect the power supply of the microcontroller (3V and GND pins) with jumpers to the bottom 2 horizontal paths of the breadboard. Then make all other connections. The jumper colors follow the usual conventions but have no functional influence.
Choose 1 resistor. (*) Bend the legs so that you can pierce them. Try to keep them as straight as possible, so they go in and out easily.
Connect the speaker to the amplifier with the screw connectors. Polarity is unimportant here.
To power on the circuit, connect the battery to the microcontroller. It will need to be programmed before it will show any behavior. See programming guide below. (Note: the connection of battery wires to plug is fragile. Never pull the battery by the wires but grasp the plastic plug.)
(*) Select resistor: The resistor determines the gain of the op-amp and thus the light sensitivity of the circuit. The greater the resistance, the greater the gain. The color coding indicates the ohm value. With the supplied set, the circuit can be adapted for use in direct sunlight in the open air to dim electrical light indoors. Experiment to find the most suitable amplification in a given situation. The resistor can be replaced while the circuit is running. To give it a fresh start, the RESET button on the microcontroller can be pressed.
Audio volume: The audio amplifier also has an adjustable resistor integrated to adjust the gain. That is the metal disc on a white plastic base. Turn it gently with a small flat screwdriver to turn the volume up or down. No sound will be heard if the setting is too low. If the setting is too high, the signal will be overdriven.
Charging the battery: Poke the battery into the microcontroller. Then use a mobile charger or computer and a micro-USB cable. Plug it into the USB connector on the microcontroller. The battery is charging as long as the red LED is on and will stop automatically. (Caution: Do not leave a charging LiPo battery unattended, a defective battery can ignite. A swollen battery must be disconnected immediately.)
Giving Body: The Komorebi Larva is born unprotected. We can make it more resilient by housing it. Then it also becomes easier to transport to observe in different environments. The speaker also sounds better when mounted in a sound box.
Programming instructions:
Updated 09/01/2021: Mozzi now officially supports ESP32 microcontrollers
This is a guide for Komorebi Larva kit users who want to get started with programming the Wemos Lolin D32 microcontroller board using the Arduino IDE software. The steps must be followed to install support for the ESP32 processor in the Arduino IDE.
If you want to work with the audio synthesis library Mozzi, then this should be installed as well. Mozzi is an advanced library for audio on microcontroller systems and great for building low-cost, small-footprint digital synths, integrating complex audio response in embedded systems, artistic projects and experiments, etc. Info, download and examples here: https://sensorium.github.io/Mozzi/
Note: previously we provided a custom mod of Mozzi to work on the ESP32 processor. In part through our efforts Mozzi now supports ESP32 officially and our modded library is not necessary anymore.
Note 2: the output signal from the DAC must always be amplified before it goes to a speaker. Connecting a speaker directly to pin 25 or 26 can cause damage to the ESP32 chip and board.
For Windows users: Although Windows allows you to work in zip files without unpacking them explicitly (eg opening this text file) it is advisable to do so. Programs in the zip files (for example the CH340 driver installer) will otherwise not work correctly and compiling Arduino code in a zip folder will also cause problems.
1. Preparing the Arduino IDE software for ESP32 board:
- Download the latest Arduino IDE software from https://www.arduino.cc/en/Main/Software (even if you have an older version installed)
- Start the Arduino IDE software and go to File> Preferences
- In the Additional Boards Manager URLs field, enter (or copy-paste): https://dl.espressif.com/dl/package_esp32_index.json and click OK.
- Go to Tools> Board> Boards Manager ...
- Enter “ESP32” in the search field and click Install in the search result “ESP32 by Espressif Systems”
- The board definitions are now downloaded and installed. INSTALLED appears when it is ready.
The Arduino IDE is now prepared to program ESP32 microcontrollers. (See also online guide here.)
2. Install USB Driver:
The Wemos Lolin D32 board uses a USB interface that requires a driver program to be installed. It can be downloaded here: https://docs.wemos.cc/en/latest/ch340_driver.html. (See also this guide for more info.)
3. Select Wemos Lolin D32 board type and serial port:
- Select Tools> Board> ESP32 Arduino> Lolin D32
- With the USB cable plugged in, you can now select the serial port that the Arduino IDE uses to communicate with the board under Tools> Port . The port names can be cryptic so you have to try them out to find the right one. You do this by selecting a port and uploading code (e.g. an Arduino IDE example: File> Examples). If a port communication error appears when uploading, the wrong port has probably been selected.
4. Install Mozzi library:
- Download and unzip Mozzi from https://github.com/sensorium/Mozzi (green "Code" button > Download ZIP)
- In the Arduino IDE, go to File> Preferences
- Look in the "Sketchbook location" field to see the working directory of the Arduino IDE on your system.
- Go to this folder with your file browser (File Explorer / Finder). Inside it go to the folder “libraries”.
- Copy the unzipped Mozzi folder to the libraries folder.
The Mozzi synthesis library is now ready to use in the Arduino IDE.
5. Upload behavior code:
- Open the sketch (code) file found in the zip file, in folder "komorebi_larva_code" (see download link above).
- Press the upload button to program the microcontroller. When upload is completed the Komorebi Larva will now be functional!
Mozzi tip: when trying the example sketches provided with the Mozzi lib, the output amplitude will likely be too large for the combination of microcontroller and amplifier we used in the kit and sound very distorted. This is remedied by scaling down the output amplitude in the line that starts with "return", example:
return asig >> 3;
Increase the number after >> (bitshift down) to scale down the output amplitude. If >> isn't there yet you can add it. If there is << (bitshift up) instead then decrease the number to scale down the signal.
6. Optional: PT8211 16 bit external DAC
The internal DAC (digital-analog converter) of the ESP32 chip provides only 8 bit resolution, resulting in rather gritty audio quality. It's possible to vastly improve audio quality by using a higher resolution external DAC. We have adapted the circuit and code to also work with the low-cost PT8211 DAC component which has 16 bit resolution. It's available with a handy break-out board here.
Connecting the PT8211 break-out board: (see pin numbering here)
PT8211 pin > Lolin D32 pinG > GND
9 > 26
22 > 33
23 > 25
3V > 3V
We didn't solder on the mini-jack socket provided with the PT8211 kit and instead soldered jumper wires directly to the GND and RIGHT pads. Audio output connections are then:
GND > GNDRIGHT > A+ of the amplifier board (remove the connection from Lolin D32 pin 26 to A+ if it is still there)
Setting Mozzi preferences for PT8211 DAC:
- Go to the Arduino library folder where you put the Mozzi library folder. Inside the Mozzi folder, find and open the file AudioConfigESP32.h in a text editor.
- Find the line:
#define ESP32_AUDIO_OUT_MODE INTERNAL_DAC
and change it to:
#define ESP32_AUDIO_OUT_MODE PT8211_DAC
- Save and close the edited file.
- Re-upload the behavior program to the board. The Komorebi Larva will now sing with a smooth, angelic voice... (It is compulsory to re-upload the program after changing the Mozzi preferences!)
We wish you a lot of fun and are very curious about your projects and experiments! Please let us know what you have created.
Circuit illustrations created with Fritzing and published under CC-By-SA license.


